I got a request from a Default Folder X user yesterday, asking if I could add a feature to limit the length of the default filename supplied in Save As dialogs. Apparently, the cloud services and backup software that he and his colleagues use can’t handle filenames longer than 45 characters, so he wants to make sure they don’t save files with names longer than that. That’s a pretty unfortunate limitation of the software they’re using (I mean really, in 2024?), but I’m all for avoiding stupid problems.
Default Folder X has a flexible, AppleScript-based method for handling customized default folders and filenames in Save dialogs. Yeah, I know AppleScript is old and crufty, but it’s available on every Mac, can interoperate with other apps, and allows you to cobble together just about anything, so it’s a good solution here. Anyway, when a file dialog appears on the screen, Default Folder X looks for and runs special AppleScripts if they’re present, allowing you to use any logic you want to determine the starting location (the “default folder”) for a file dialog, and the name of the file suggested in Save As dialogs.
The AppleScripts should be located in this folder:
where the ‘~’ character denotes your home folder. Default Folder X looks for scripts with predetermined names, depending on their purpose:
getDefaultFilename.scpt – modifies the suggested filename in Save As dialogs
getDefaultFolder.scpt – specifies the default folder for an Open or Save dialog
Note that the scripts must be saved with those names in order for them to work. If you want a script to only run in the Open and Save dialogs of a single application, put it in a subfolder with the same name as the app. For example, to have scripts that only run in Safari, save them in:
The implementation details (the name of the AppleScript handler and the arguments that Default Folder X passes to it) are included at the beginning of each of these sample scripts:
OK, back to the task at hand. In this case, we want to provide a “getDefaultFilename” handler that truncates the default filename in Save dialogs to no more than “maxLength” characters.
Here’s the AppleScript:
on getDefaultFilename(appName, suggestedName, fileExtension)

  -- Specify our maximum filename length
  set maxLength to 45

  -- Make sure the filename extension isn't counted
  set addExtension to false
  if fileExtension is not "" and suggestedName ends with fileExtension then
    set suggestedName to text 1 thru -((count fileExtension) + 2) of suggestedName
    set addExtension to true
  end if

  -- Truncate the filename
  if length of suggestedName is greater than maxLength then
    set newName to text 1 thru maxLength of suggestedName
  else
    set newName to suggestedName
  end if

  -- Add the extension back on if appropriate
  if addExtension is true then
    set newName to newName & "." & fileExtension
  end if

  -- And give the name to Default Folder X
  return newName

end getDefaultFilename
Enter the code above in Script Editor and save it as an AppleScript script or download GetDefaultFilename.zip. Save the “GetDefaultFilename.scpt” file in this location:
Each time a Save As dialog appears, it will magically truncate any filenames longer than 45 characters. Note that you can still edit the name afterwards in the Save dialog if you don’t like the one created by the script.
Credit Where Credit is Due
This scheme originated with an idea from Jason Snell (of Six Colors and The Incomparable fame) when he needed to customize the way Default Folder X worked in his podcasting workflow. I later expanded it as requests came in for customized filenames as well, and Bo Engelbrecht’s email reminded me that I’d never blogged about those updates. Thanks Jason and Bo!
Version 1.8.8 of Jettison was released today, adding a new option for mounting disks while also fixing some annoying issues.
When you hold down the Command key, the “Mount” command in Jettison’s menu becomes “Mount and Open.” As you’d expect from the name, selecting a disk will not only mount it so it’s available for use, but will also open a new Finder window showing its contents. This is a handy shortcut if you want to mount an offline disk and immediately get to work with it.
On the bug-fix side of things, this release fixes an issue that could wake up the display while Jettison ejected external disks. This didn’t cause problems with sleep, but could be confusing when manually putting a Mac to sleep. You’d invoke sleep, the screen would go dark and then would immediately wake back up, then it’d go black again and the machine would finish going to sleep. Just weird.
Version 1.8.8 also addresses a problem with disks not mounting properly if they’re encrypted but already unlocked, and improves error messages when failures occur while mounting encrypted disks. It also gives a more helpful error message when you try to manually mount an encrypted drive whose password isn’t in your keychain.
As always, full release notes and the downloadable update are available by choosing “Check for Updates” from Jettison’s menu in your menu bar, or from the Jettison – What’s New page.
Version 6.0.7 of Default Folder X is available now. It fixes a number of issues that occurred when using Open and Save dialogs in certain situations and is recommended for all Default Folder X 6 users.
It also adds a new setting – currently only available via a Terminal command – to change the way arrow keys work in its Quick Search window. By default, the left and right arrows navigate into a folder when it’s selected in the Quick Search results.
This works well when navigating the results, where up and down arrows move the selection up and down the list, and the right arrow moves “into” a selected folder so you can search just within that folder. However, this means the arrow keys are not available for moving back and forth in the search field if you want to edit your search string.
If you’d like the left / right arrows to instead move the text cursor in the search field, run the Terminal application (you’ll find it in /Applications/Utilities), paste in the command below, then hit the Return key on your keyboard:
Once you’ve done that, you can move into and out of folders in the search results using Tab and Shift+Tab in place of the left and right arrow keys. To change the setting back to its default, just replace the “YES” in the command above with “NO”.
If you’re already running Default Folder X, choose Check for Update from Default Folder X’s menu in your menu bar to get the new version. If not, head to the What’s New page for download links, as well as detailed release notes.
Version 2.7.6 of App Tamer is available for download, delivering a bunch of changes. Among them is the option to click on a column header to sort processes by name, CPU usage, or average CPU usage. Prior to this release, the list of running processes was always sorted by average CPU usage – you didn’t have a choice.
I’ve hesitated to add this because I worry that it may cause confusion for some people. If they accidentally click on a column header without realizing it, the list will no longer be showing the most CPU-hungry apps at the top. And they won’t know how to get it back to doing that.
Nevertheless, for those that understand it, sorting by something other than “% Avg” (average CPU usage) is helpful. It’s been a common request for quite a while, so I’m finally relenting – let’s hope my worries are unfounded and it doesn’t cause trouble for anyone.
In addition to this change, App Tamer 2.7.6 also improves its user interface in a number of little ways – everything from making buttons more obvious to smoothing out the animation used when its window opens.
And functionally, there are a couple of important fixes. App Tamer now correctly recognizes all battery-powered Macs. Prior to this release, it actually looked for “Book” in the model identifier of the machine to determine whether it should look for a battery. That was fine when the model identifiers were things like “MacBookAir10,1”, but then Apple released the 2022 MacBook Air with a model ID of “Mac14,2”. Whoops – now my “Book” shortcut looks pretty stupid 🙄.
In addition, the default throttling setting for common web browsers has been changed so that they’re allowed 10% CPU usage when they’re in the background, rather than 2%. This should reduce the possibility that audio or video will stutter when the browser’s not frontmost. If you still get choppy audio, try setting the limit for your browser even higher, or consider turning off “Slow down this app” in your App Tamer settings for it.
There a complete list of all the changes in version 2.7.6 on the App Tamer release page, along with links to download the new version.
A mention of Default Folder X on episode 940 of MacGeekGab reminded me (yet again) about this useful podcast, hosted by Dave Hamilton and John F. Braun. Their goal with each episode is for everyone to learn at least 5 new things about working with their Mac, iPhone, or associated bits, and they almost always succeed. I highly recommend their podcast if you’re into Mac tips and tricks!
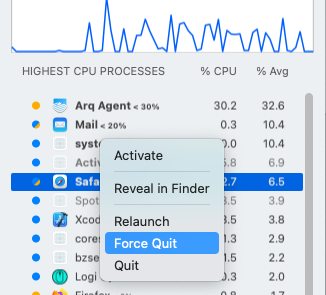
Version 2.6.5 of App Tamer is available, sporting fixes for a few things that have come to my attention since the last release. Specifically, App Tamer’s Force Quit command, which you can get to by Control-clicking on any app in the process list, now ensures that the app is terminated even if it’s being very uncooperative.
Some UI inconsistencies have also been fixed, including small changes to the text color and font size used in App Tamer’s icon in your menu bar. And there’s a fix to App Tamer’s high-cpu-usage-detection warnings so that if some helper process (like one of Safari’s web content renderers) uses lots of CPU, App Tamer tells you to limit Safari’s CPU usage to fix the problem, rather than complaining about the helper process itself.
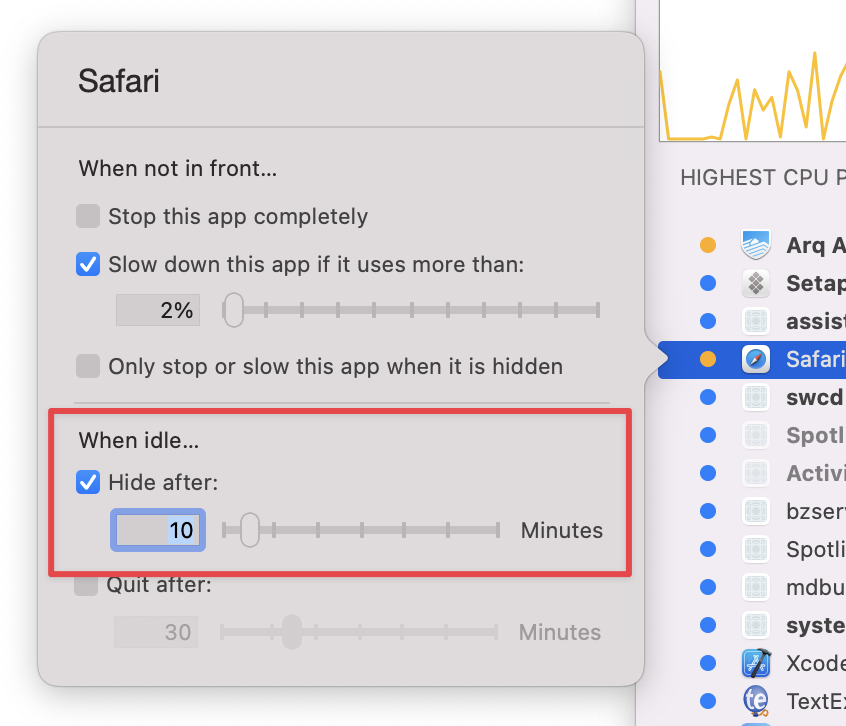
This release also includes the “inverting” of an existing feature to fill the niche left by the demise of the app Hocus Focus. App Tamer already offered an option to hide particular apps after they’d been idle for a certain amount of time, but if you wanted that to apply to all applications, you had to turn the feature on for every app individually. Now you can set up all apps to be hidden after 5 minutes (or whatever) in one fell swoop by using these commands in Terminal:
The first command turns on the “hideWhenIdle” feature, while the second sets the “minutesUntilHide” time to 5. You can obviously use any delay you want for minutesUntilHide. To turn the feature off again, just set hideWhenIdle to zero:
Also, if you want a few apps to wait longer to hide, you can override the time using App Tamer’s normal hide-when-idle feature, accessible in the settings popover that you get by clicking on an app in the process list. Or to prevent the app from being hidden regardless of how long it’s been idle, enter zero into the edit box next to the slider.
As usual, concise release notes and download links are available on the App Tamer Release page, or if you’re already running App Tamer, by choosing “Check for Update” from utility menu at the bottom of App Tamer’s window.
With the recent focus on Default Folder X’s integration with Path Finder, I’ve been fielding a number of questions about how to make Default Folder X open folders in Path Finder instead of the Finder.
Using Path Finder instead of the Finder for all apps
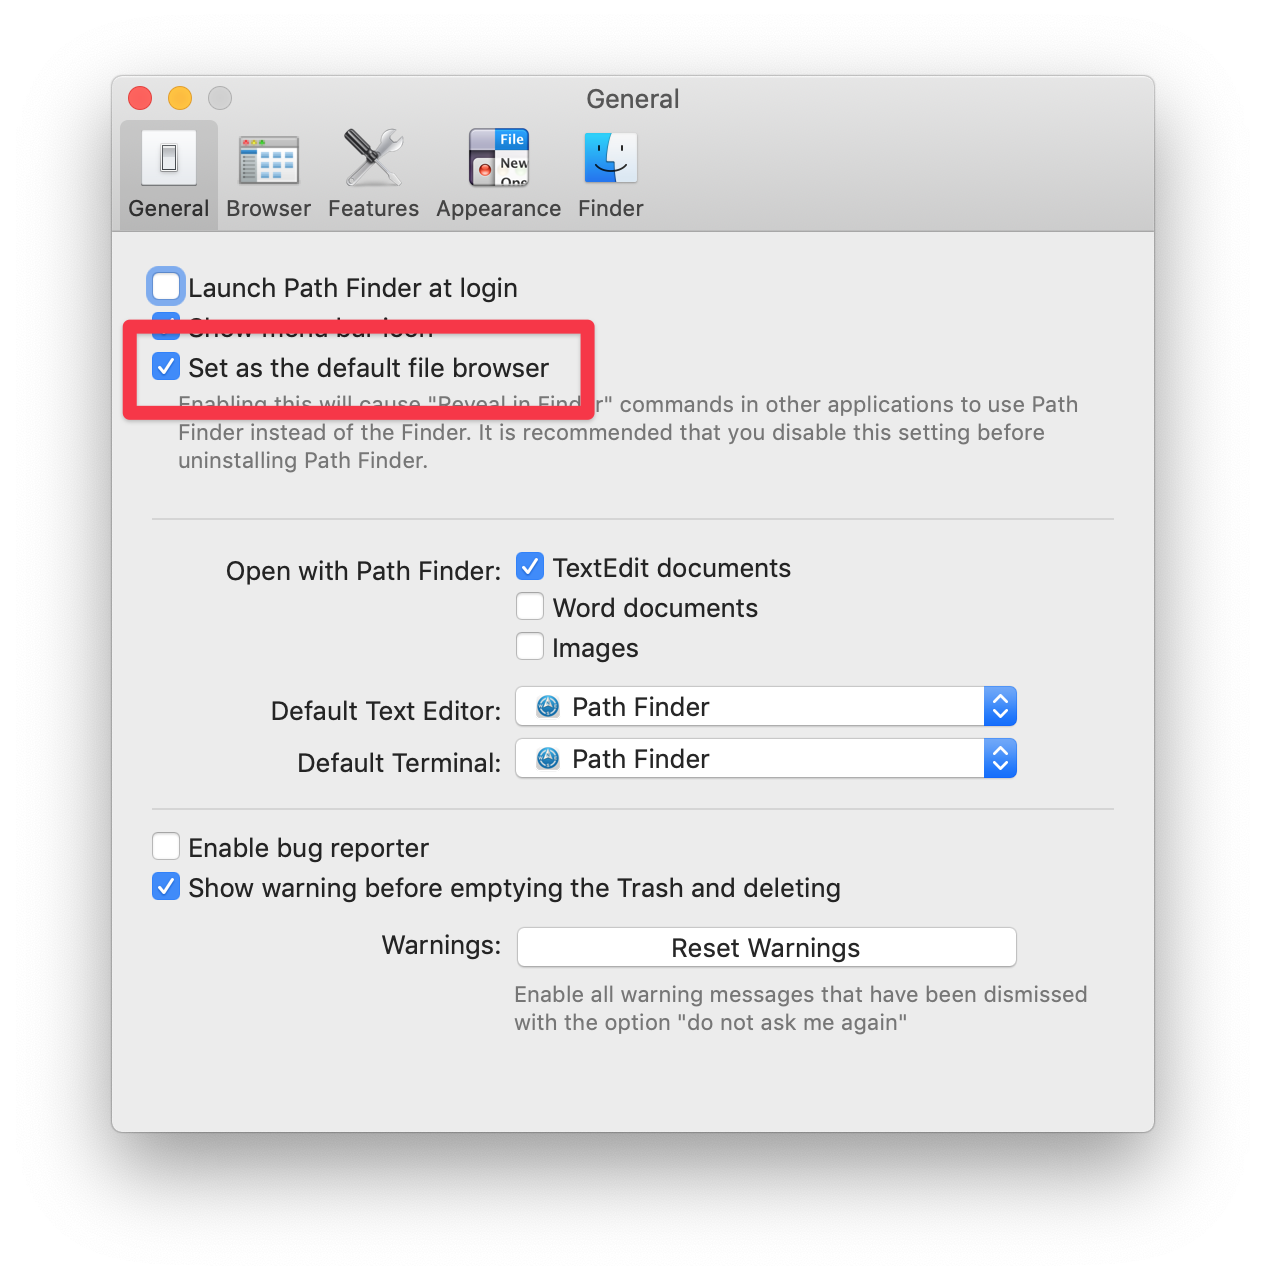
The first, simplest answer is that Default Folder X uses your “default file browser” when opening folders. If you set your default file browser to be Path Finder, selecting a folder from Default Folder X’s menus will open it in Path Finder. This will also make all other apps on your Mac use Path Finder for their “Reveal in Finder” commands.
“But how the heck do I set Path Finder as my default file browser?” you say. Well, I’m glad you asked! It’s easy – there’s a setting in your Path Finder preferences:
Turn on this checkbox and you’re done.
Using Path Finder instead of the Finder – but just for Default Folder X
If you’d rather make this apply only to Default Folder X, you can set Default Folder X’s “fileViewer” preference in Terminal with this command:
Note that if you’re using the Setapp version of Path Finder, you should replace ‘com.cocoatech.PathFinder’ with ‘com.cocoatech.PathFinder-setapp’. To tell Default Folder X to go back to using the Finder instead of Path Finder, just replace ‘com.cocoatech.PathFinder’ with ‘com.apple.finder’.
Toggling between Path Finder and Finder on the fly
And finally, if you want to get really fancy and sometimes have Default Folder X open folders in the Finder and sometimes in Path Finder, you can set up an AppleScript to toggle back and forth. Attaching a script like this to a keyboard shortcut using Peter Lewis’ amazing Keyboard Maestro app makes it super-easy:
-- set the 'currentViewer' variable to the current fileViewer setting
set currentViewer to do shell script "defaults read com.stclairsoft.DefaultFolderX5 fileViewer"
-- now switch to whichever fileViewer is currently not in use
if currentViewer is "com.apple.finder" then
     do shell script "defaults write com.stclairsoft.DefaultFolderX5 fileViewer com.cocoatech.PathFinder"
else
     do shell script "defaults write com.stclairsoft.DefaultFolderX5 fileViewer com.apple.finder"
end if
Version 2.6.2 of App Tamer is available, fixing a couple of user interface bugs that could trip up new users. When newly installed, the size of App Tamer’s window was much smaller than it was supposed to be, making it hard to see the list of tamed processes. Compounding this was a change in version 2.6.1 that resulted in the mouse cursor not turning into a little arrow when you hovered over the edges of the window, so you couldn’t tell it’s resizable.
Another glitch, a result of changes that Apple made in Big Sur, could result in the names of processes being truncated in the process list. That’s been fixed as well.
You can find the full release notes and download links to App Tamer 2.6.2 on the App Tamer Release Page.
An experimental feature for a very specific system problem:
And now for the geeky, experimental feature: It’s come to my attention that some people are living with bugs in macOS that can result in essential background processes (like lsd and pkd) suddenly consuming tons of CPU time and bringing their Mac to a standstill. Despite chasing around to try and find the culprit, they often can’t resolve the problem without completely reinstalling the system. And apparently, App Tamer’s process throttling can’t limit the CPU usage without effectively disabling whatever function those processes are supposed to be performing.
So I’ve added a “runaway process assassin” to App Tamer. You specify which processes to watch, and if the CPU usage of any of them stays above a specified limit for a certain amount of time, App Tamer just kills the process. This certainly isn’t ideal, but works fine for system daemons that macOS will automatically relaunch whenever they’re needed. This feature is probably only useful to a few people, but because it isn’t something that’s easy to code up with an AppleScript or shell script, I figured I’d just add it. App Tamer is already collecting the CPU statistics anyway.
To configure this, you have to use Terminal. Paste in these commands, hitting the Return key after each one:
The first command turns on the killRunawayProcesses feature.
The second sets runawayProcessCPULimit to 50. You can set that to whatever CPU percentage you want.
The third sets runawayProcessTimeLimit to 20. This is how long (in seconds) the process has to be above its limit before App Tamer kills it.
The fourth sets runawayProcessList to watch lsd and pkd. You can add as many processes as you want here, separated by spaces. For full-fledged applications, use the app’s bundle identifier.
When App Tamer kills a process, it will put up a notification to let you know. You’ll probably want to make sure you’ve allowed App Tamer to display notifications in System Preferences > Notifications.
WARNING: Don’t turn this on unless you have a real need for it! You could potentially kill a service that’s necessary for your Mac to operate correctly. However, if you do need and make use of this feature, I’d appreciate hearing from you in the comments or at support@stclairsoft.com.
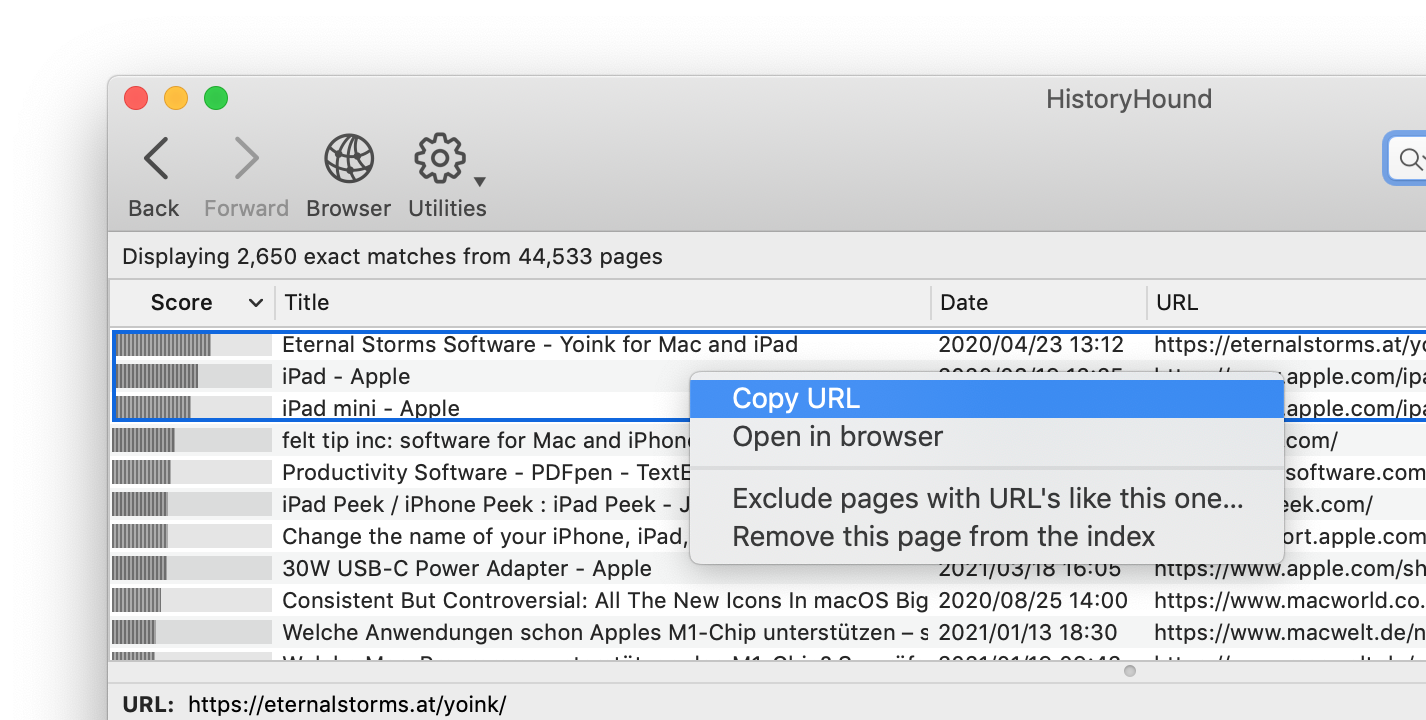
HistoryHound 2.3.2 is a small update that delivers bug fixes and introduces multiple-item selection to the search results list.
Multi-selection lets you act on multiple results at a time to:
copy their URLs as a list
open them all in your browser
create a filter to exclude them from future inclusion
remove them all from your search index
As a reminder, HistoryHound follows macOS’s standard method for selecting multiple items in a list:
Command-click an item to add it to the current selection
Shift-click to extend the selection from the currently selected item to the item you’re clicking on
Full release notes and download links are available on the HistoryHound Release Page, or if you’re already running an earlier version of HistoryHound, just choose “Check for Updates…” from its menu.
Version 1.8.2 of Jettison is now available. It brings a number of improvements, including several fixes for problems remounting disks after they’ve been ejected.
Jettison’s error reporting has also been improved so that it catches edge cases where a disk unmounts after Jettison has been told by the system that the unmount failed. This should prevent those error messages that said a problem had occurred, but then didn’t list any disks in the error details.
For several releases now, Jettison has been quietly quitting Photos, iTunes and Music before it ejects disks, then relaunching them when those disks are remounted. This prevents problems for the many people that keep their photos or music on external drives. In doing this, however, Jettison was a little too aggressive: It quit the apps when you chose “Eject External Disks Now” from its menu as well as when the machine went to sleep. That turned out to be a Bad Idea, so now it’s only done before ejecting disks when the machine is actually going to sleep.
In a similar vein, there are now some preference settings accessible via Terminal to tweak this behavior. You can turn off the auto-quit / relaunch behavior using this command in Terminal:
where a whitespace-separated list of process names goes in place of photoanalysisd.
And yes, if these options prove popular, they’ll get their own place in the preferences dialog so you no longer have to use Terminal to set them up.
So anyway, this is available in Jettison 1.8.2, with details and download links on the Jettison Release Page. Or if you’re already using Jettison, choose “Check for Updates” from its menu in your menu bar.