|
|
|
|
|

|
Archive for the ‘Tips’ Category
Tuesday, February 28th, 2017
This is information I originally posted back in 2009, but here we are 6 macOS versions later and it’s still relevant – and people are still asking for it.
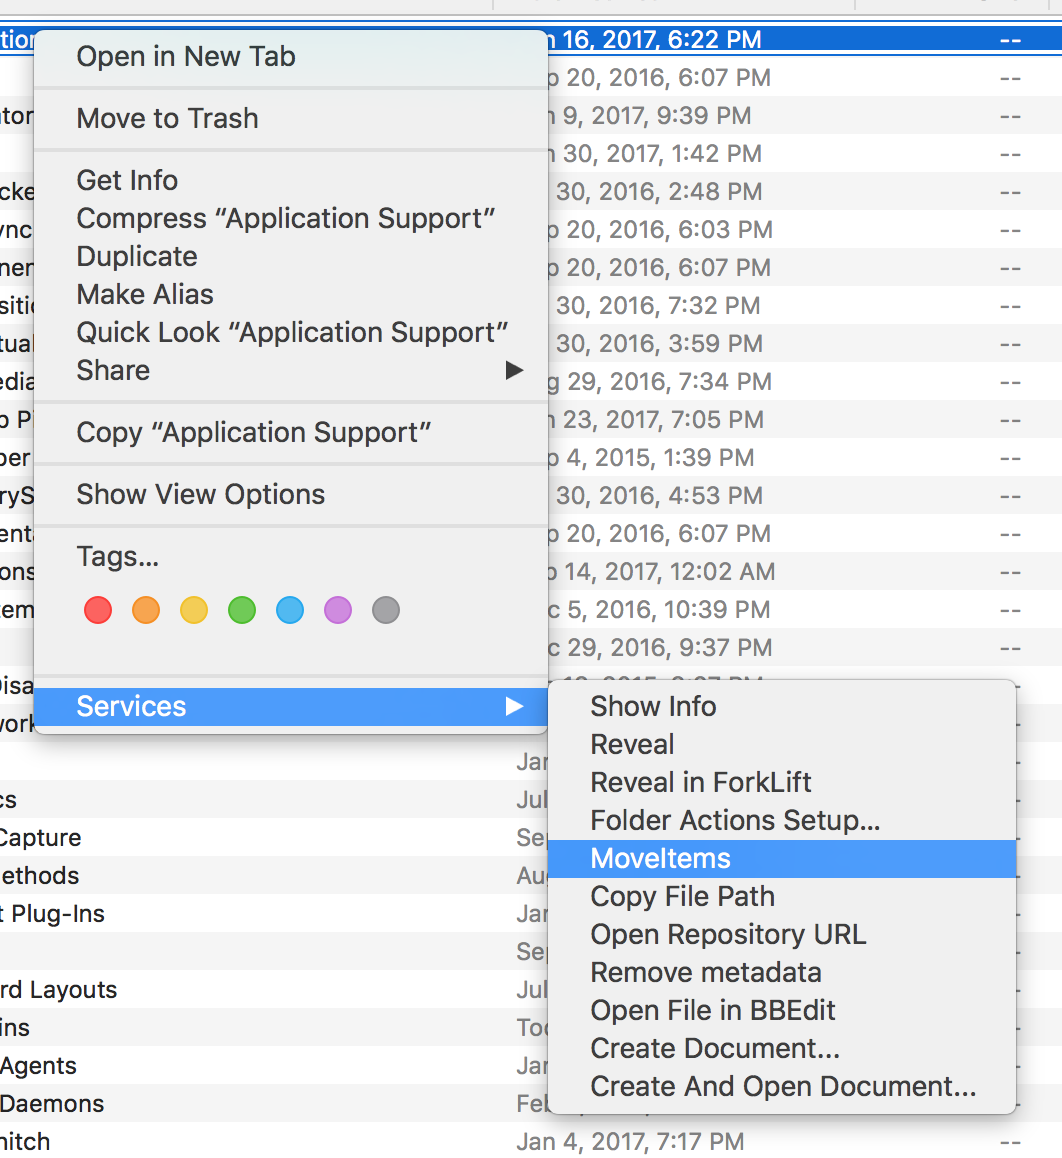
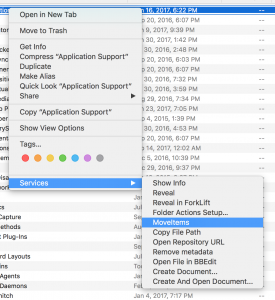
Below are details on how to create a “Move Items” contextual menu item in the Services menu in the Finder (see the picture below).
It pops up a file dialog to let you specify where you want to move the selected items, which then allows you to use Default Folder X, giving you access to all of your Favorite and Recent folders, Finder-click, etc.
TL;DR: If you just want to get things to work, there’s a link at the bottom to download an already-built Automator workflow.
Contextual menu items are added by making a Workflow in Automator and saving it as a Service. You start by running the Automator application (it’s in your /Applications folder), creating a new Workflow, and setting it up as shown in the (old) screenshots below:
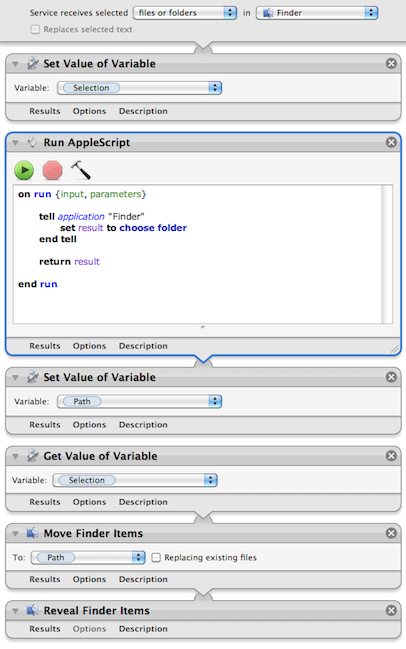
If you’re experienced with Automator, you’re probably asking: Why go to the trouble of creating variables instead of just using the “Move Finder Items” action by itself? I’m glad you asked! The reason is that I want to bring up a file dialog to specify the folder where I want the items to go. There’s not a clean way to have the “Move Finder Items” do that every time. You can change its options to “Show this action when the workflow runs” but you still have to click on it every time you use it to ask it to show a file dialog. If you use Default Folder X to enhance your Open dialogs, it’s faster to just have the dialog pop up and then go where you want to with DFX.
So in the image above, the workflow puts the current Finder selection into the “selection” variable. Then it uses AppleScript to bring up a file dialog to ask for a folder, which it stores in the “path” variable. And finally, it uses the Move Finder Items action to do the work. Not too much more complicated, and it speeds up your workflow considerably if you’ve already got DFX installed so the Open dialogs are smart.
For you Automator programmers, note that some of the actions shown in the workflow do not take inputs. I did this by control-clicking on the action (“Get Value of Variable”, for example) and choosing “Ignore Input” from the contextual menu. If you don’t do this, Automator will actually add the input from the previous step to the next one, which is definitely not what you want in this case.
Oh, and if you just want the automator workflow file so you can add it to your own system, you can download it here:
https://www.stclairsoft.com/download/MoveItems.zip
If you need more help with Automator and Services, Sal Soghoian has some good information and tutorials here:
https://www.macosxautomation.com/services/learn/
(Once you’ve gotten through the first few steps of the tutorial, you should be able to just replicate the picture above to make the Move Items service yourself).
Posted in Code, Default Folder X, Sierra, Tips | 2 Comments »
Friday, December 16th, 2016
So I’ve run into this issue both as a user and as a developer – on MacBook Pros that have both a discrete and integrated GPU, fancy animations will cause the system to switch to the more powerful discrete GPU, reducing battery life. Chris Liscio wrote a great post explaining what’s going on and what to do about it (from a developer’s perspective). The key takeaway for most developers:
This whole problem can be very easy to solve. You just have to set NSSupportsAutomaticGraphicsSwitching key to YES in your application’s Info.plist. The trouble is that an OpenGL context is being created, which defaults to switching the dGPU on. Enabling this flag in the plist will very likely fix the problem on its own, as the frameworks should Do the Right Thing (more details below) if they need access to OpenGL.
Go read his whole post for all the details.
Posted in Code, Development, Tips | No Comments »
Thursday, March 10th, 2016
 I’ve long been an avid (addicted) user of LaunchBar – if you’re a person that’s keyboard-based like I am, it’ll save you ridiculous amounts of time. Hit Command-Space to activate LaunchBar and then start typing – you can do anything you want to without taking your hands off the keyboard. I’ve long been an avid (addicted) user of LaunchBar – if you’re a person that’s keyboard-based like I am, it’ll save you ridiculous amounts of time. Hit Command-Space to activate LaunchBar and then start typing – you can do anything you want to without taking your hands off the keyboard.
Now I’m happy to announce that Manfred Linzner, an engineer at Objective Development (the makers of LaunchBar), has put together a LaunchBar action that gives you access to Default Folder X’s favorite and recent items within LaunchBar.
If you’re a LaunchBar user, you just need to download the Default Folder X Files action from Manfred’s Github repo. After it downloads, double-click on the .lbaction file and LaunchBar will offer to install it for you. Then it’s just a matter of invoking LaunchBar and typing the first few letters of “Default Folder X Files” (or “DFX”) to get this:
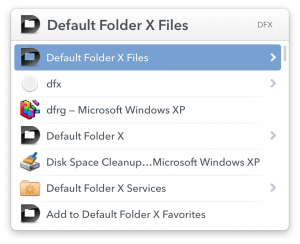
Hit the right arrow key from there to select any favorite or recent folder or file from Default Folder X, or Command-right-arrow to narrow the search to just your Favorites, Recent Files, or Recent folders.

Yet another way to get to your files and folders faster – thanks Manfred!
Posted in Default Folder X, Development, Tips | 3 Comments »
Tuesday, March 31st, 2015
I haven’t seen this little Yosemite tidbit anywhere on the web and have had people request it as a feature in Default Folder X, so I know it’ll help at least a few folks out there.
In the Open and Save dialogs of Cocoa applications (Safari, Preview, Pages, etc) you can right-click on the column headers to get a popup menu to change which columns are displayed in all of your file dialogs.
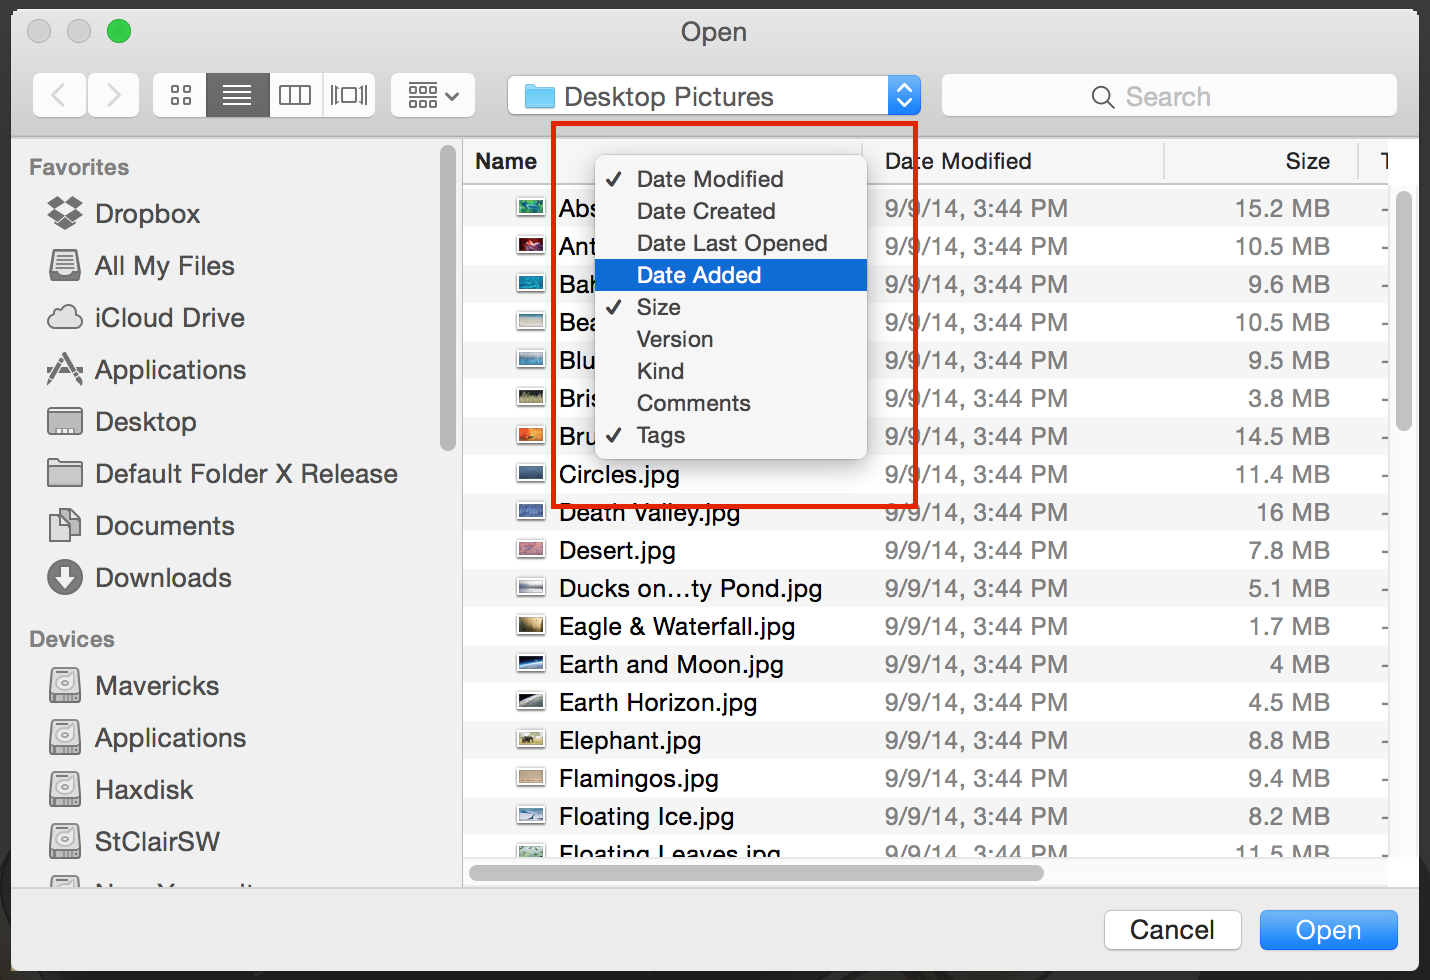
Simply turn the checkboxes off and on by selecting items from the menu. Once you’ve got the columns you want, you can rearrange them by clicking on a particular column header and dragging it left or right.
As I said, the popup menu is only available in Cocoa applications, but the changes you make will take effect in all of your applications – even Carbon apps (like Chrome, Word, Excel, etc) that don’t have the popup menu.
Posted in Default Folder X, Tips, Yosemite | 3 Comments »
Wednesday, March 25th, 2015
App Tamer 2.0.5 just dropped, fixing a compatibility glitch with Safari that could cause App Tamer to mis-manage full-screen Flash playback (among other things). There are also a host of smaller fixes that will improve your user experience, like better error messages, fixing permissions problems automatically, etc.
This version also explicitly offers to switch to a logarithmic cpu graph on 8- and 16-core Macs to increase the amount of detail you can typically see on the graph (science and tech nerds nod here, while everyone else says “what the heck is a logarithmic cpu graph?”).
What’s logarithmic graph good for?
Basically, it changes the vertical scale of the graph so that data toward the bottom of the graph is magnified, while the top of the graph is squeezed together. Since most of the activity on the cpu graph is down below 50% on 8- and 16-core Macs (because you’re rarely actually using all 8 or 16 cores), this lets you see more details that you care about.
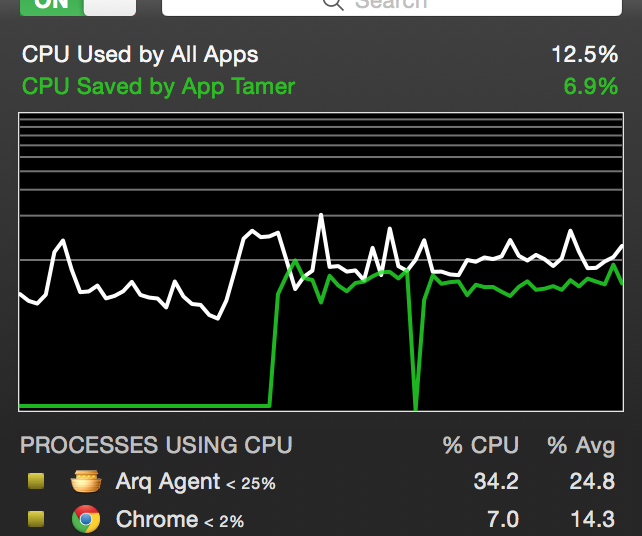 In the screenshot of App Tamer’s logarithmic cpu graph to the right, each horizontal gray line on the graph represents a 10% increment. As you can see, the bottom 10% increment takes up half of the vertical space, the next 10% takes up 15% of the space, and so on, with each successive 10% increment taking a smaller amount of screen real estate. This magnifies the bottom end of the graph, where most of the activity happens on Macs with lots of cpu power. In the screenshot of App Tamer’s logarithmic cpu graph to the right, each horizontal gray line on the graph represents a 10% increment. As you can see, the bottom 10% increment takes up half of the vertical space, the next 10% takes up 15% of the space, and so on, with each successive 10% increment taking a smaller amount of screen real estate. This magnifies the bottom end of the graph, where most of the activity happens on Macs with lots of cpu power.
You can toggle between a regular linear graph and the logarithmic one by control-clicking (or right-clicking) on the graph. A little popup menu lets you choose which scale you want to use.
Back to your regularly scheduled program…
Sorry for the digression. You can see the full change history and download App Tamer 2.0.5 on the App Tamer Release Page.
Posted in App Tamer, Tips, Yosemite | No Comments »
Tuesday, January 6th, 2015
The most recent versions of MacCleanse 4 and MacKeeper delete Default Folder X’s preference files, even when Default Folder X is still installed on your Mac. Among other things, this will delete your Default Folder X license information and revert it to running in demo mode. To avoid this problem, please stop using MacCleanse and MacKeeper until their developers have fixed these bugs. I’ve notified them about the problem.
Thanks! – Jon
Posted in Default Folder X, Tips | No Comments »
Thursday, June 19th, 2014
 You learn something new every day! You learn something new every day!
Default Folder X was featured on the Mac Geek Gab podcast again this week, but not for the usual reason of being a fast way to navigate all of your files and folders. A user wrote in to say that he uses Default Folder X to solve a common problem with accessing disks on a network. OS X will sometimes drop a network-connected drive off the desktop, making it inaccessible until you explicitly contact the server again. Default Folder X can actually help with this by automatically reconnecting to the server when you use an Open or Save As dialog. You simply have to set a folder on the server as a Favorite folder or the default folder for the application you’re using. When you access that Favorite or default folder using Default Folder X, it will automatically find the server and reconnect to it if it’s available.
Thanks for that reminder Carsten!
Posted in Default Folder X, Tips | No Comments »
Tuesday, September 17th, 2013
“How the heck do I change the sort order of my files in Open and Save dialogs?” We get this question a lot, and I can’t blame you for being confused. The controls for sorting the list of files in Open and Save dialogs are a bit of a mess. They’re the result of new features being layered on top of older user interface controls, leaving you with some odd and confusing combinations.
In the beginning – well, OK, not The Beginning beginning, but quite a few years ago – you could only sort in file dialogs by clicking on the top of the columns in list view.
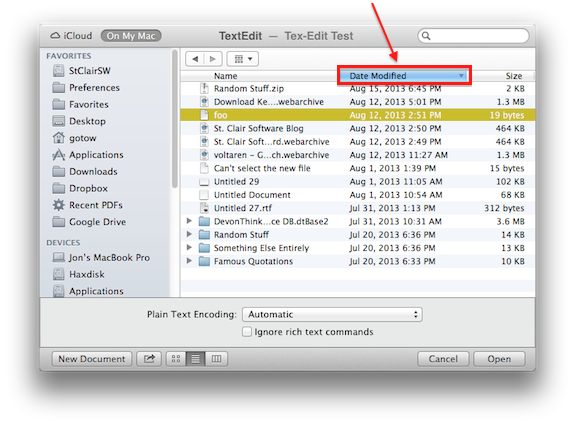 If you want to sort by date, you click on the “Date Modified” column header. The little triangle at the right side of the header shows you whether you’re sorting in ascending or descending order. Clicking the header again toggles between ascending and descending. To sort by name, click on the “Name” header. Pretty simple, right? If you want to sort by date, you click on the “Date Modified” column header. The little triangle at the right side of the header shows you whether you’re sorting in ascending or descending order. Clicking the header again toggles between ascending and descending. To sort by name, click on the “Name” header. Pretty simple, right?
Wait, what column headers?That original method still works today, but only in List View, because there aren’t any column headers in Column View or Icon View. I know, you may not even be aware that there are different views in file dialogs. This is column view:
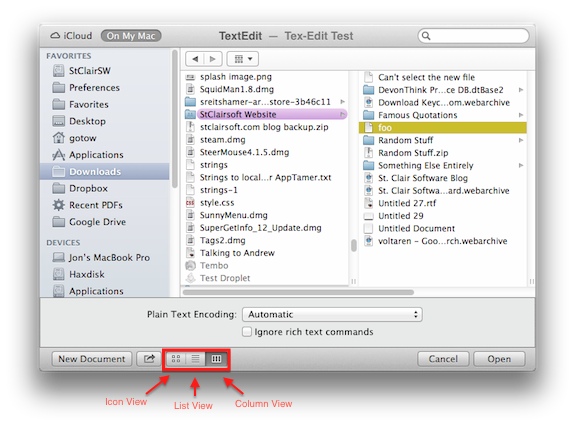
Click on those little buttons I’ve marked in red to change views. Note that they’re on the bottom of the file dialog in some applications, but at the top of the dialog in others. Don’t ask – that’s just the way it is.
So.. Method #1 for sorting your files: Click on the List View button and then on the column header you want to sort by.
But that doesn’t always work. Yeah, I just told you how to do what you want, but now I’ll screw it all up by showing you the new sorting controls, which completely disable method #1. In Mac OS 10.7 and later, there’s this nifty little sorting button at the top of the file dialog:
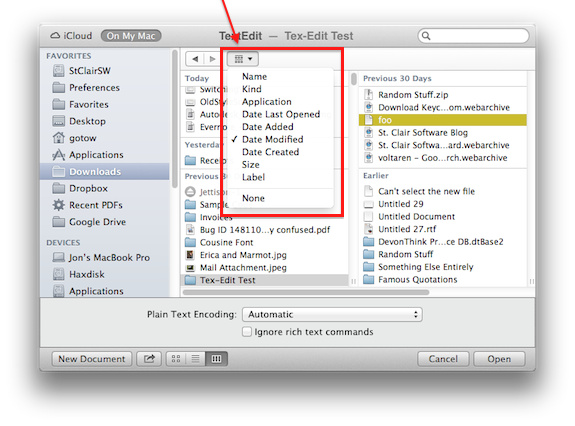 Selecting a sorting method from this menu gives you the new Finder-style sorting with interspersed headers saying “Today”, “Yesterday”, “Previous 30 Days”, “Earlier” etc – you can see them in the screenshot above. The confusing thing is that this will also sort List View windows that way, and will completely disable your ability to click on the column headers to sort the Old Way (what I called method #1). Selecting a sorting method from this menu gives you the new Finder-style sorting with interspersed headers saying “Today”, “Yesterday”, “Previous 30 Days”, “Earlier” etc – you can see them in the screenshot above. The confusing thing is that this will also sort List View windows that way, and will completely disable your ability to click on the column headers to sort the Old Way (what I called method #1).
So… Method #2 for sorting your files: Click on the Sort Menu button and select a sorting method.
And now the inevitable question: What if I don’t want those “Today, Yesterday, Previous 30 days” things in the way? I’m glad you asked – mostly because I don’t like them myself 🙂 If you want to go back to the Old Way of sorting in list views, start with the Sort menu and choose “None”. Then click on the List View button and click the column headers to select your sort method.
Posted in Default Folder X, Tips | No Comments »
Sunday, April 21st, 2013
 Someone asked about this today – it’s useful stuff that’s not obvious, so I figured I’d share it here. If there are navigation keys or shortcuts that I’ve missed, please comment. Someone asked about this today – it’s useful stuff that’s not obvious, so I figured I’d share it here. If there are navigation keys or shortcuts that I’ve missed, please comment.
There are a number of keyboard navigation keys that are standard in all Open and Save dialogs, but they vary a bit depending on the view mode you’ve got selected.
In List View:
- Up and down arrows move up and down the file listing
- ⌘+Right-Arrow displays the contents of a folder without opening it (it turns the little twisty-arrow next to the folder)
- ⌘+Up-Arrow goes up to the parent folder
- ⌘+Down-Arrow opens the selected item
In Column View:
- Up and down arrows move up and down the file listing
- Left and right arrows traverse left and right in the column listing
- ⌘+Up-Arrow goes up to the parent folder (when you’ve gotten all the way to the leftmost column)
- ⌘+Down-Arrow opens the selected item
In Icon View:
- Up, down, left and right arrows traverse among files
- ⌘+Up-Arrow goes up to the parent folder
- ⌘+Down-Arrow opens the selected item
And of course, when keyboard focus is on the file list, typing the first few letters of a file or folder’s name selects it. Note that in Save dialogs, this requires tabbing 3 times (usually) to get the keyboard focus from the filename edit box to the file list.
There are also some command key shortcuts, I’ve borrowed this list from http://www.productivityorchard.com/keyboard-shortcuts-for-mac-os-x-open-save-dialog
- Spacebar – View the selected item in Quick Look
- ⌘+D – changes focus to your Desktop
- ⌘+Shift+A – Changes focus to your Applications directory
- ⌘+Shift+H – changes focus to your Home directory
- ⌘+Shift+N – Creates a new folder.
- ⌘+Shift+Period (.) – Toggle hidden files & folders on and off.
- ⌘+Shift+G – Brings up Go To Folder window
- Tab – Tab key auto-completes paths and file names from the aforementioned Go To window
- ⌘+R – Reveals the file in Finder
- ⌘+F – Move the cursor to the Find field
- ⌘+Period (.) – Close the Open/Save dialog window
Posted in Default Folder X, Tips | No Comments »
Sunday, January 13th, 2013
From time to time I get requests to make Default Folder X automatically type the date or some other information into new filenames in Save dialogs. While this may be a good idea for a handful of people, the complexity and number of variations I’d have to support would result in a lot of additional settings in Default Folder X’s already crowded preferences.
Not only would it add complexity to Default Folder X, but there is already an easy solution to this – text macro utilities. I personally add the date to some filenames using Typinator, a “text expander” application from Ergonis Software. I just type “dt” and it automatically expands to the current date – and not just when I’m typing a name for a file in a Save As dialog – it’ll expand that shortcut wherever I type it on my Mac.
If you need this sort of shortcut when you’re saving files – or writing emails, filling in web forms, taking notes, etc – check out one of these tools (there are others – these are just a few of the major ones):
Typinator
TypeIt4Me
Keyboard Maestro
TextExpander
If you’ve got others you think should be added here, don’t hesitate to post a comment or give me a shout @stclairsoft
– Jon
Posted in Default Folder X, Tips | 1 Comment »
|

|
|

|
|