
|
|
|
|
|

|
Archive for the ‘Tips’ Category
Tuesday, March 20th, 2012
 I’ve had requests from a number of people asking for a hotkey to pop up Default Folder X’s menus under the mouse. That way you don’t have to go all the way up to the menubar to get to your Favorite and Recent folders. Default Folder X doesn’t currently have a keyboard shortcut for this, but you can make one easily with any macro utility that supports AppleScript. Keyboard Maestro is one example. I’ve had requests from a number of people asking for a hotkey to pop up Default Folder X’s menus under the mouse. That way you don’t have to go all the way up to the menubar to get to your Favorite and Recent folders. Default Folder X doesn’t currently have a keyboard shortcut for this, but you can make one easily with any macro utility that supports AppleScript. Keyboard Maestro is one example.
Just configure your macro program to run this AppleScript:
    with timeout of 0 seconds
        ignoring application responses
            tell application "Default Folder X"
                ShowMenu
            end tell
        end ignoring
    end timeout
That’s all there is to it! Thanks to Scott Mintzer for jogging my memory on this.
Update – Andrew Gara wrote to remind me: If you’re running Default Folder X with its “Show icons and menus in the Dock” setting turned off, the application target in the AppleScript should be “Default Folder X Helper” instead of “Default Folder X”. Thanks Andrew!
Posted in Code, Default Folder X, Tips | 1 Comment »
Friday, February 17th, 2012
Default Folder X 4.4.9 is available, providing a couple of new features and an important bug-fix as well.
First the unpleasant stuff: A bug in previous versions of Default Folder X could cause crashes in other applications if they asked OS X to open an http URL using particular APIs. This caused Karelia’s Sandvox to crash, among others. This is fixed in version 4.4.9, so get the update – really.
On to lighter things: A nice little feature that numerous people have requested. Until now, there’s been no easy way to add a folder to your Default Folder X Favorites directly from the Finder. Now there is – a contextual menu in the Finder:
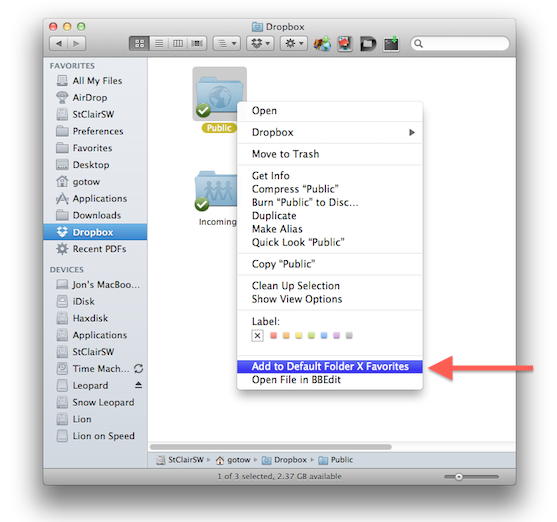
Here’s how you get it:
- Install version Default Folder X 4.4.9.
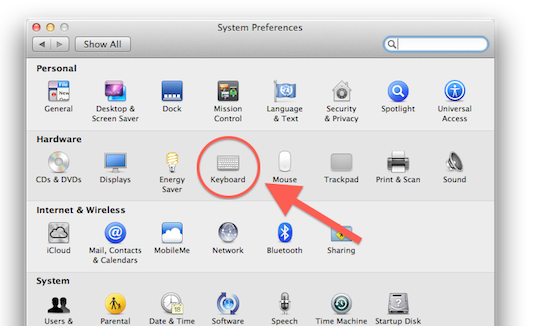
- Run System Preferences and click on Keyboard.
- Select the Keyboard Shortcuts tab in your Keyboard preferences, then click on Services in the left hand list.
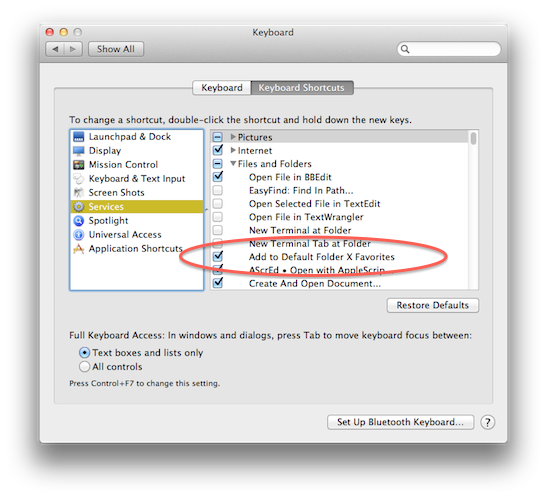
- In the right hand list, locate the Files and Folders section and find Add to Default Folder X Favorites. Turn on the checkbox next to it.
- Quit System Preferences
- Now, whenever you select a folder in the Finder, you can right-click (or control click) on a folder and add it to your Default Folder X favorites.
Posted in Default Folder X, Tips | 3 Comments »
Wednesday, March 30th, 2011
Thought I’d post about this little developer experience because it was incredibly frustrating and not at all obvious. Maybe this will save someone else the headache that I’ve been through.
Background: When preparing an application for release on the Mac App Store, you code sign your application, then bundle it into an installer pkg which is also code signed (using either Xcode organizer or the productbuild command line tool). When the application is installed, it gets extracted from that .pkg file, the user runs it, and it checks for a Mac App Store receipt. If there’s no receipt, OS X checks to make sure that the application is signed correctly, then contacts the Mac App Store to get your receipt.
Problem: This would all work for me as advertised except that when the receipt check failed, OS X would complain that my application wasn’t code signed, and therefore wouldn’t contact the App Store to get the receipt. From a user’s perspective, the app would just fail to launch.
I’d followed all the instructions. I double- and triple-checked to make sure the application was signed before I built the .pkg file. I tried building the .pkg using both the Xcode organizer and productbuild – they both worked with no problems or error messages. Yet when the application came out of the .pkg file on the other end, it was always unsigned! I deleted all of my certificates, regenerated them, and redownloaded them from Apple’s developer site (several times). I checked every step along the way in my build process – they were all working. It was incredibly frustrating because the signed app went into the ‘black box’ of the .pkg file just fine, but came out on the other end without its code signature.
Solution: After tearing my hear out for a while, googling for answers, and checking the developer forums, I finally tracked down the solution. I had a single image file in my application’s resources that had its permissions set to 640 instead of 644, meaning that it was not readable by everyone. That threw the entire game off – apparently when the installer unpacked the .pkg file, it ran into this problem file and either stopped short of installing the code signature, or invalidated the signature. Either way, the application it installed was useless. Simply changing the permissions on that one tiff file fixed the problem I’d been fighting with for days.
Soooo…. If your app builds and runs fine UNTIL you package it, and then comes out unsigned on the other end, check the permissions on the resources in your application. And Apple, please emit some kind of warning when hapless developers feed productbuild a file with the wrong permissions that’s gonna screw up the whole process.
Tip: There’s a really cool developer utility called Cong, written by Stephane Sudre. It checks your application for all kinds of minor errors, from localization goofs in .strings files to incorrect Info.plist entries to missing files in your package. I’ve contacted Stephane and checking file permissions is now on his To-Do list for Cong. If you’re a developer, get a copy of Cong – a simple drag-and-drop could save you a lot of time and trouble!
Posted in Development, Random Ramblings, Tips | 2 Comments »
Monday, December 20th, 2010
A couple of App Tamer’s extra preference settings aren’t actually documented in the released version. They were added during development and were described in the beta notes, but never made it into the documentation. So, until that gets resolved in the docs for version 1.0.3, here’s a quick run-down:
- App Tamer can hide applications when they are stopped rather than dimming their windows. To turn this on, quit App Tamer and then use this command in Terminal:
defaults write com.stclairsoft.AppTamer hideWhenStopped 1
To turn the feature back off, use:
defaults write com.stclairsoft.AppTamer hideWhenStopped 0
- When window dimming is turned on, the brightness of the dimmed windows can be modified with a defaults setting. Run this command in Terminal (the default value is 65% – lower percentages are darker, higher percentages are brighter):
defaults write com.stclairsoft.AppTamer dimPercentage 65
Posted in App Tamer, Tips | No Comments »
Monday, April 12th, 2010
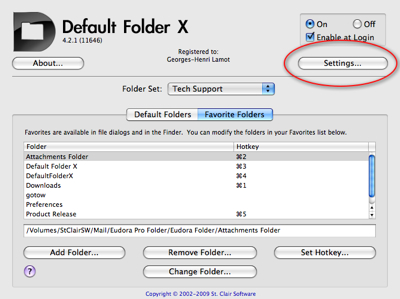
Default Folder X lets you mark folders as favorites so you can get to them quickly. Unfortunately, it displays those folders in its menus using their names – if you’ve got two identically named folders named “Images,” for instance, they both show up in Default Folder X’s menus as “Images” and it’s hard to tell them apart.
Because of this, I’ve gotten a few requests for the ability to change the names of Favorites without changing the name of the actual folders that they point to. This feature is on my To-Do list, but in the meantime here’s a workaround to do it with the current version of Default Folder X:
- Open Default Folder X in System Preferences.
- Click on the Settings button.
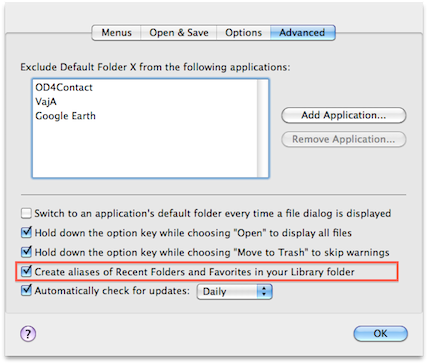
- Click on the Advanced tab and turn on “Create aliases for Recent Folders and Favorites in your Library folder”.
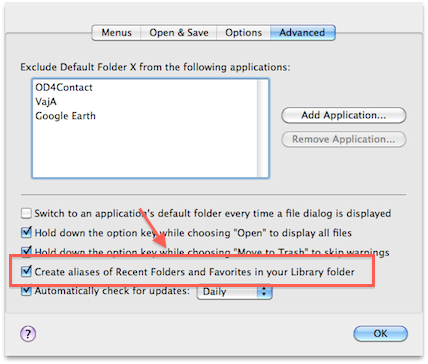
- In the Finder, navigate to this folder: HOME/Library/Favorites. Locate the aliases of the folders you want to rename.
- Rename the alias files using the Finder. Default Folder X will then read those names and substitute them for the original folder names in its menus.
Posted in Default Folder X, Tips | No Comments »
Monday, March 29th, 2010
Many people are familiar with the Option-down-arrow keyboard shortcut in Default Folder X. When you’re using an Open or Save dialog, it takes you straight to the last folder you used. (If you haven’t been using this, try it – it saves a TON of time).
What most people don’t know is that there’s a hidden setting in your Default Folder X preferences that will let you use the same keyboard combination in the Finder. Press Option-down-arrow and the most recent folder in your DFX Recent Folders menu will open up in a new window.
To enable this, open System Preferences and select Default Folder X. Hold down the Option key while you press the “Settings…” button and you’ll get this sheet of options:
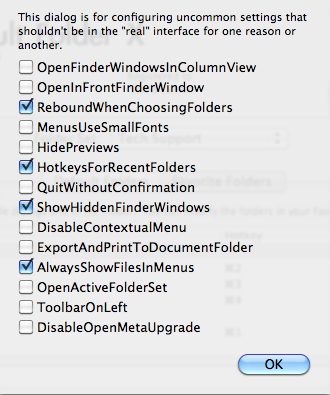
Turn on the checkbox marked “HotkeysForRecentFolders” and click OK. That’s all there is to it.
If you’re curious about all of the other “secret settings”, have a look at this blog post.
Posted in Default Folder X, Tips | No Comments »
Friday, March 26th, 2010
LaunchBar is a great ‘mouse-free’ utility for instantly getting to files, folders, URLs, music, addresses, and just about anything else on your Mac. Hit command-spacebar and start typing the first few letters of whatever you want – LaunchBar lists the choices that match and you just hit the return key to open or go to that item. I use it all the time and recommend it to everyone I know.
There’s a really handy way of including your recent and favorite folders from Default Folder X in LaunchBar’s index. After doing this, you can instantly access those folders from the keyboard using LaunchBar.
To make Default Folder X favorites and recent folders available in LaunchBar do the following:
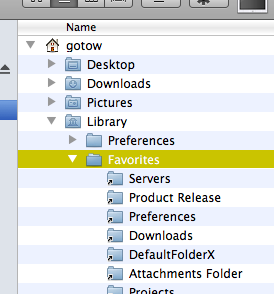
- In your Default Folder X preferences, click on the Advanced tab and turn on “Create aliases of Recent Folders and Favorites in your Library folder”.
- In LaunchBar, choose Show Index from the Index menu. Click on the “Folder+” button in the toolbar to add a folder.
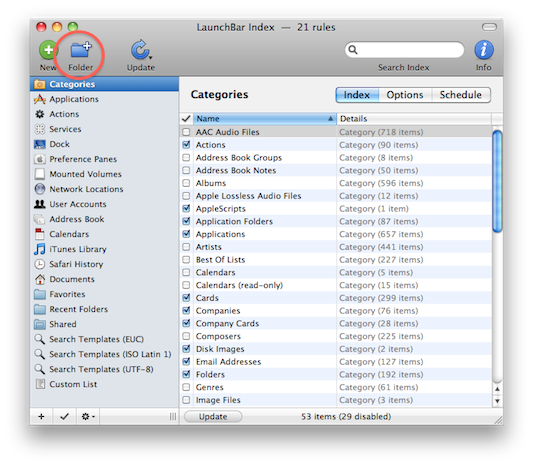
- Select the HOME/Library/Favorites/ folder.
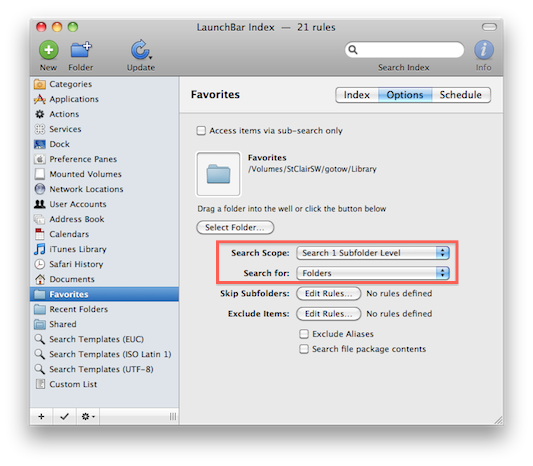
- Once the folder is added, click on the Options tab for that folder and set Search Scope to “Search 1 Subfolder Level” and Search for “Folders”.
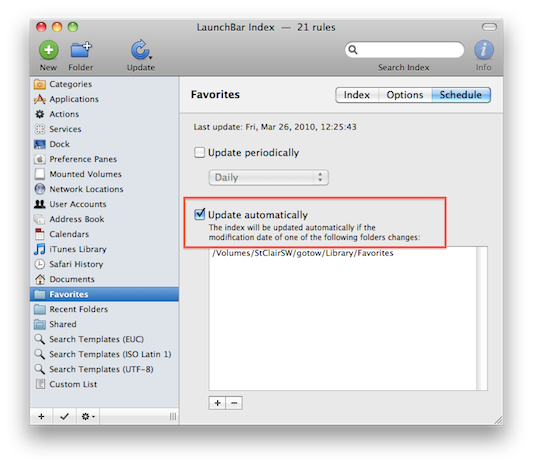
- Click on the Schedule tab and turn on the “Update automatically” checkbox.
- Repeat steps 2-5 for the folder HOME/Library/Recent Folders/
- Once you tell LaunchBar to reindex, you’ll have access to all of your Default Folder X favorite and recent folders.
Thanks to Gary Schelling for asking about this and jogging my brain 🙂
Posted in Default Folder X, Leopard, Snow Leopard, Tips | 1 Comment »
Wednesday, September 16th, 2009
Contextual menu plugins are dead in Snow Leopard, replaced by the revamped Services system. A user recently contacted me because he wanted to replicate the “Move Items” contextual menu item he used to use in Leopard. He had used Automator to create a service, but was having a few problems, namely that Default Folder X wasn’t available when he chose the destination folder.
This got me to open up Automator in Snow Leopard and take a crack at it myself. In the process, I was reminded how cool Automator is 🙂 At any rate, here’s the automator script I put together:
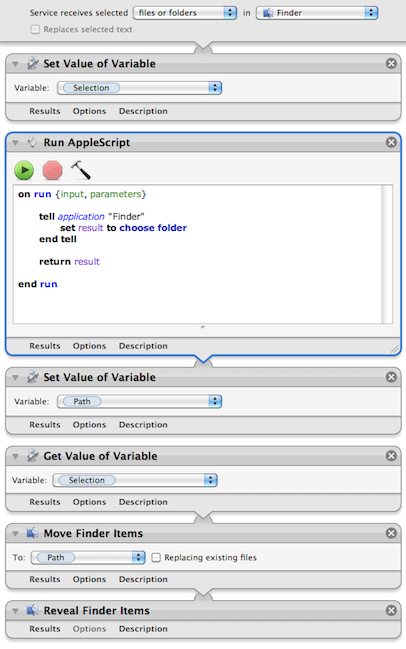
So you’re obviously asking: Why go to the trouble of creating variables instead of just using the “Move Finder Items” action by itself? I’m glad you asked! The reason is that I want to bring up a file dialog to specify the folder where I want the items to go. There’s not a clean way to have the “Move Finder Items” do that every time. You can change its options to “Show this action when the workflow runs” but you still have to click on it every time you use it to ask it to show a file dialog. If you use Default Folder X to enhance your Open dialogs, it’s faster to just have the dialog pop up and then go where you want to with DFX.
So in the image above, the workflow puts the current Finder selection into the “selection” variable. Then it uses AppleScript to bring up a file dialog to ask for a folder, which it stores in the “path” variable. And finally, it uses the Move Finder Items action to do the work. Not too much more complicated, and it speeds up your workflow considerably if you’ve already got DFX installed so the Open dialogs are smart.
For you automator programmers, note that some of the actions shown in the workflow do not take inputs. I did this by control-clicking on the action (“Get Value of Variable”, for example) and choosing “Ignore Input” from the contextual menu. If you don’t do this, Automator will actually add the input from the previous step to the next one, which is definitely not what you want in this case.
Oh, and if you just want the automator workflow file so you can add it to your own system, you can download it here:
http://www.stclairsoft.com/download/MoveItems.zip
If you need more help with Automator and Services, Apple has some good information and tutorials here:
http://www.macosxautomation.com/services/learn/
(Once you’ve gotten through the first few steps of the tutorial, you should be able to just replicate the picture above to make the Move Items service yourself).
Posted in Code, Default Folder X, Snow Leopard, Tips | 5 Comments »
Wednesday, August 12th, 2009
I’ve added a new Overview screencast to the screencasts page. I kept it focused on the efficiency side of Default Folder X, so it doesn’t highlight all of the features. I felt it was important to get the primary point across and not get lost in the details.
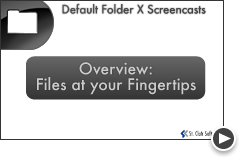
Default Folder X Overview
(QuickTime video – 3:18)
I’m interested to hear your opinions – particularly whether the focus is right (getting to your files vs. details like rebound, tagging, etc).
Posted in Default Folder X, Tips | 9 Comments »
Monday, July 13th, 2009
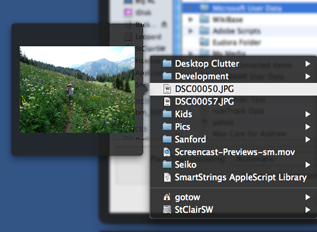
I’ve received a number of emails asking why the new file previews only work in Default Folder X’s system menu, and not in its menus in the Open and Save dialogs. This is because Default Folder X normally doesn’t display files in its file dialog menus — those menus are used for navigating among folders.
You can, however, change this using a hidden setting. Here’s how:
- Open System Preferences and select Default Folder X.
- Option-click on the “Settings” button.
- Turn on the “AlwaysShowFilesInMenus” checkbox.
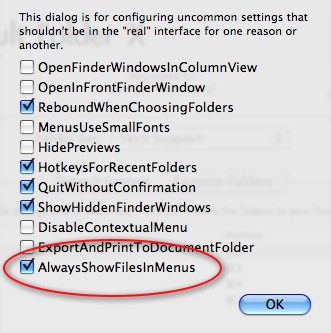
- Click OK and quit System Preferences.
- The menus that Default Folder X places next to Open and Save dialogs should now show previews like this.
Note: With this setting turned on, Default Folder X will show all the files in each folder, regardless of whether the current application can open them or not. If you select a file that the application can open, DFX will take you to the folder containing the file and select it in the file dialog. If the application can’t open the file, you’ll be switched to the file’s folder, but nothing will be selected.
Posted in Default Folder X, Tips | 1 Comment »
|

|
|

|
|